Reference - UI State-Bound Components
A component can “listen” to change events in another component, and be updated accordingly; e.g. a Media Player could listen to a listbox of Video domain items, and update to play the selected video.
For React, CodeBot generates a reusable library of Redux Finite State Machines (FSMs) to track and maintain global state across the app, so that components on different pages can be bound to other components’ UI state.
When its value changes, a component may behave slightly differently inside a form. In a form, it’ll trigger a “form value changed” event rather than an individual “component value changed” event; this is to prevent the page being slowed down with fine-grained change events flying around.
However, if another component is specifically bound to a component inside a form, it should still generate an individual “component value changed” event for the listener… so in practical terms, you may not notice a difference.
Not to be confused with data-linked components
Component binding and linking are two separate concepts (both very powerful in their own way!):
- Components can be linked to a domain class, e.g. a listbox can display
Videoitems, or a form can create newVideo Reviews - Components can be bound to other components (the topic of this page). When the bound component updates (e.g. item selection changed), the listening component gets the update and reacts in some way. How it updates depends on the combination of the two component types.
Two ways to bind components
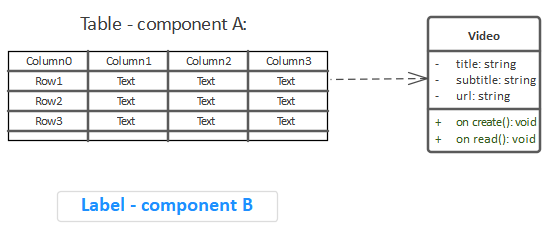
Let’s say we have Component A (a table) and component B (a label). We want the label to display an attribute from the selected table row:

To bind Component A to Component B, either:
- Draw a dependency arrow from
BtoA - Add a
bindtagged value toB
1. Draw a dependency arrow from B to A

To specify which attribute the label should display, put the attribute name in the arrow name (“title” in this case). Although that’s the recommended way, you can also create a domain tag on the label, and put the attribute name there.
The arrow must point from
BtoA- in other words,Bis dependent onA. If drawn the other way round,Awould be reacting to UI changes inBinstead.
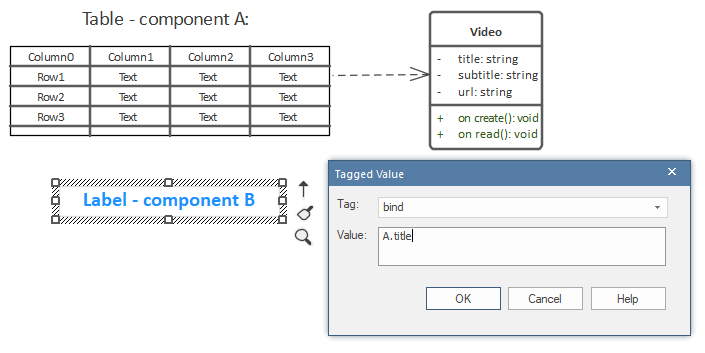
2. Add a bind tagged value to B

The value should be the name of the other component, in this case A. The second value (after the “.”) in the above screenshot is the attribute name that the label should display.
If A is on a different wireframe, also include the wireframe name: Other Wireframe.A
A bind tag can be separated into up to three parts, separated using dot notation:
- Wireframe name
- Component name
- Attribute name
Out of these, only the component name is always required. The wireframe name is optional if the two components are on the same wireframe. The attribute name is also optional, but recommended. If absent, CodeBot will look for a default name depending on the component type (e.g. “url” for the MediaPlayer), and will fall-back to the first available attribute in the domain class.
Component chaining
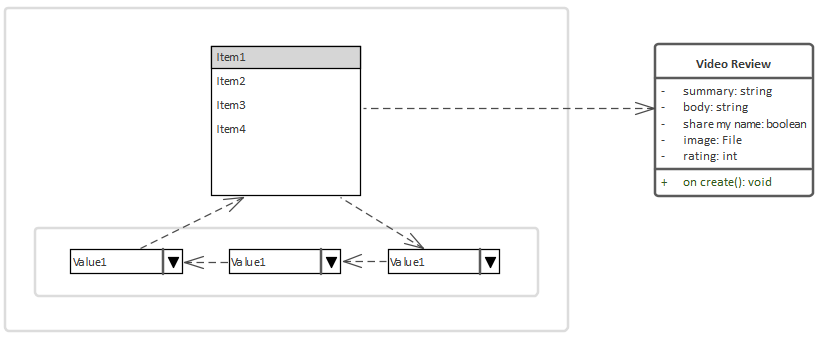
Should you need to, you can also chain components together:

In the above example, if a listbox item is selected, the first ComboBox’s selection is updated to match, which triggers the second ComboBox to do the same, and so on to the third. Changing the selection in, say, the second ComboBox would also cause the third ComboBox to update.
Because the listbox also has a dependency on the third ComboBox, this creates a circular dependency; so, changing the selection in any of the components will cause them all to update. Removing that particular dependency would allow the third ComboBox’s selection to be updated independently.
Each of the above components should have a domain tag defining the attribute name to display, e.g. summary, rating. The default behaviour is to show the first available attribute in the domain class.
If the number of dependency arrows on the wireframe starts to become too much, you can also use the
bindtag (to bind components) anddomaintag (to link a component with a domain class).
A fully wired-together page
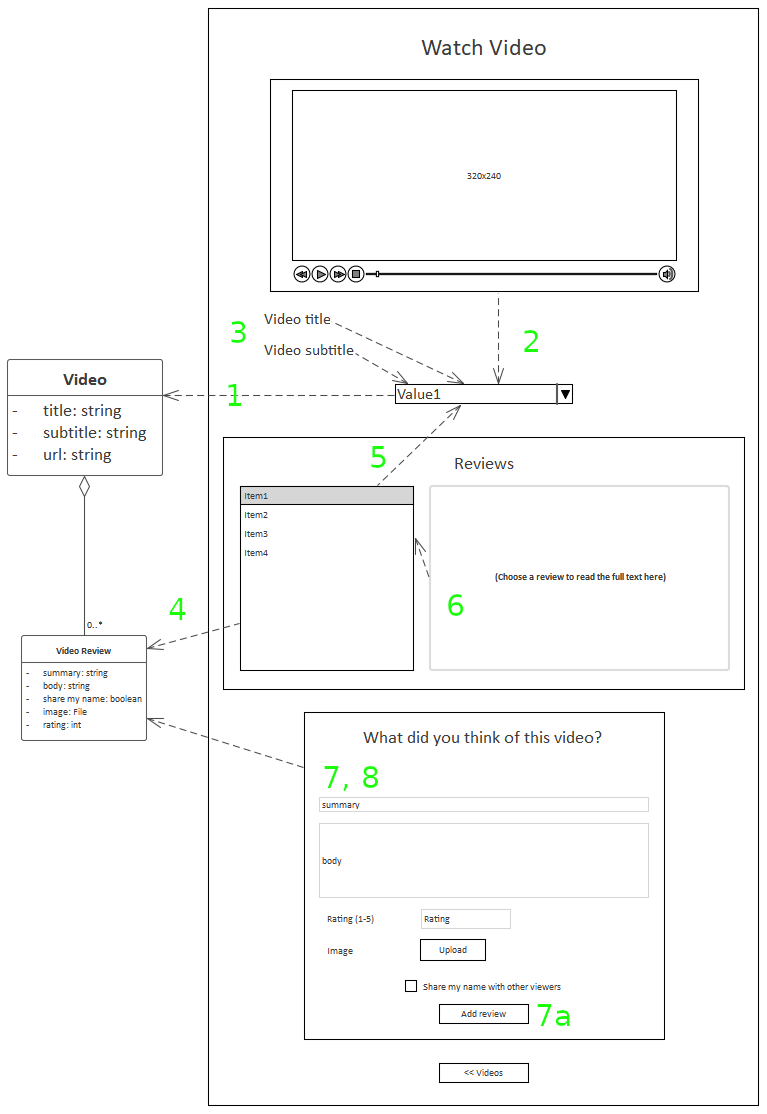
This wireframe shows how to link up several components on one page:

- The ComboBox is linked to the
Videodomain class, so will show all availableVideos - The Media Player is bound to the ComboBox, so it will play whichever
Videois selected - The
Video titleandVideo subtitlelabels are both also bound to the ComboBox - The listbox is linked to the
Video Reviewdomain class, so will show all availableVideo Reviews. However… - … it’s also bound to the
Videos ComboBox, so - because of the aggregation relationship betweenVideoandVideo Review- the listbox will only show reviews that belong to the selected video. (NOTE: this functionality is on its way, & will be delivered very soon!) - The TextArea is bound to the
Video Reviews listbox and configured to show the review text. So it’ll update to show whichever review is selected in the listbox
Further down in the same wireframe:
- The “What did you think of this video?” container is a form, because it has a submit button (7a) with a
createaction (not shown in the screenshot) and is linked toVideo Review - (Also not shown in the screenshot), the review form is also bound to the
VideoComboBox via abindtagged value; so when the form is submitted and the review created, the new review will belong to the selectedVideo
In item 8, we used a
bindtag for tidiness, to avoid a dependency arrow being drawn right up & across the middle of the wireframe.