Example Project - Hello CodeBot

Hello CodeBot is a straightforward example project which should quickly provide you with a good idea of what CodeBot can do, given even a quite minimal input model.
To try Hello CodeBot, you’ll first need to have created an account with us and logged in.
You can find more “getting started” details in this tutorial, though you shouldn’t need everything described there in order to try out this example.
If you don’t yet have a CodeBot account…
If you just want to see an example of what CodeBot can do, here’s the complete generated zipfile… you’ll be able to download this to your PC and run the complete software stack locally. (To run it, you’ll need Node/NPM, and access to a MongoDB database - check the README.md file in the zip).
Also, spoiler alert… here’s the React web-app already generated and online with its own REST API and Mongo database. It was deployed via our “one-click generate model, build and deploy” hosting service. Feel free to register a user, login and watch videos on the “home” page!
But for a quick run-through of how to generate the project for yourself, read on…
Download the UML Model and/or XMI file
>>Download the Hello CodeBot model for Enterprise Architect (zip includes the.eapxEA model, plus the same model exported in XMI format)
>>Download the Hello CodeBot model for MagicDraw (already exported as XMI, can be loaded straight into MD)
You can upload either of the above XMI versions to the CodeBot web console, in order to generate and deploy the application - we’ll show you how to do that in the next section.
The model is worth exploring, as - in addition to being a quick “how-to” guide - it also adheres to the recommended CodeBot UX modeling best practices.
A quick note about XMI files
In case you were wondering why we’re talking about XMI files… XMI stands for XML Metadata Interchange; it’s a file format that both EA and MD can export. CodeBot doesn’t read the “native” format from either modeling tool (.eapx for EA, or .mdxml for MD); instead it reads XMI files exported from either tool.
CodeBot understands XMI 2.1 files exported from EA, and XMI 2.5 files exported from MD. (Those versions were chosen because they’re the default export formats selected by the respective modeling tool).
For the purpose of this “Hello CodeBot” exercise, though, all you really need to know is: “Upload the XMI file to the CodeBot web console” :)
Generate the application
Now that you have the model, you’re ready to run CodeBot and try out the generated application. There are two approaches:
- Run CodeBot via Enterprise Architect and our EA add-in
- … or, upload the XMI file to the CodeBot web console
In more detail:
1. Run CodeBot via Enterprise Architect and our EA add-in
The easiest way to try the project out - assuming you have both Enterprise Architect and our EA add-in installed - is to generate the application directly from the model.
First double-click the .eapx file to load the project into EA. Have a look at the domain model and wireframes while you’re there…
When you’re ready, right-click on the root “Model” package in the Package Browser, and choose Specialize > Parallel Agile > Generate Project.
2. … or, upload the XMI file to the CodeBot web console
If you don’t have either EA or the add-in installed, you can still generate the whole system via the CodeBot web console, using the already-exported XMI file. (EA and MD links above…)
Try it out!
Login to the web console (if you haven’t already), and click “Visit website”. The hosted React UI will load in a separate tab:

More about how Hello CodeBot works…
You’re currently on page 2 of the CodeBot Guide tutorial.
During this tutorial you’ll learn in quite some detail how CodeBot interprets the domain model and wireframes. But let’s dive into a little bit about how Hello CodeBot works… As you’ll see in a moment, with CodeBot working for you there’s very little that needs to be done, in order to turn your EA model into a full-stack web application.
The model can be organised however you prefer; however we tend to recommend the following package layout:

Hello CodeBot Domain model
The Domain Model is a class diagram which (for this example) just contains a couple of domain classes - User and Video. These define the data schema that will be used consistently throughout all architectural tiers in the application.
Use Cases
During UX design, use cases are an excellent way to define goal-based user interaction. They’re not essential for a quick demo project like Hello CodeBot, but we’ve included some in the model as a straightforward example of they can be applied to the UX design process.
Wireframes
Each page (or screen, if you’re targeting desktop or mobile apps in addition to web) is drawn in EA’s wireframe editor:

Data-linked (i.e. data-aware) components such as forms and listboxes can be linked directly to domain classes - e.g. in the above wireframe, the login form is linked to the User domain class. CodeBot pretty much always figures out your intention from that single link.
The generated system includes a secure REST API which manages data storage and querying via a back-end Mongo database. The UI components and associated state-management code are generated to work “out of the box” with the REST API.
For Hello CodeBot we’ve just defined 3 pages: Login, Register and Home. Home is only accessible if you’ve registered as a User and logged in.
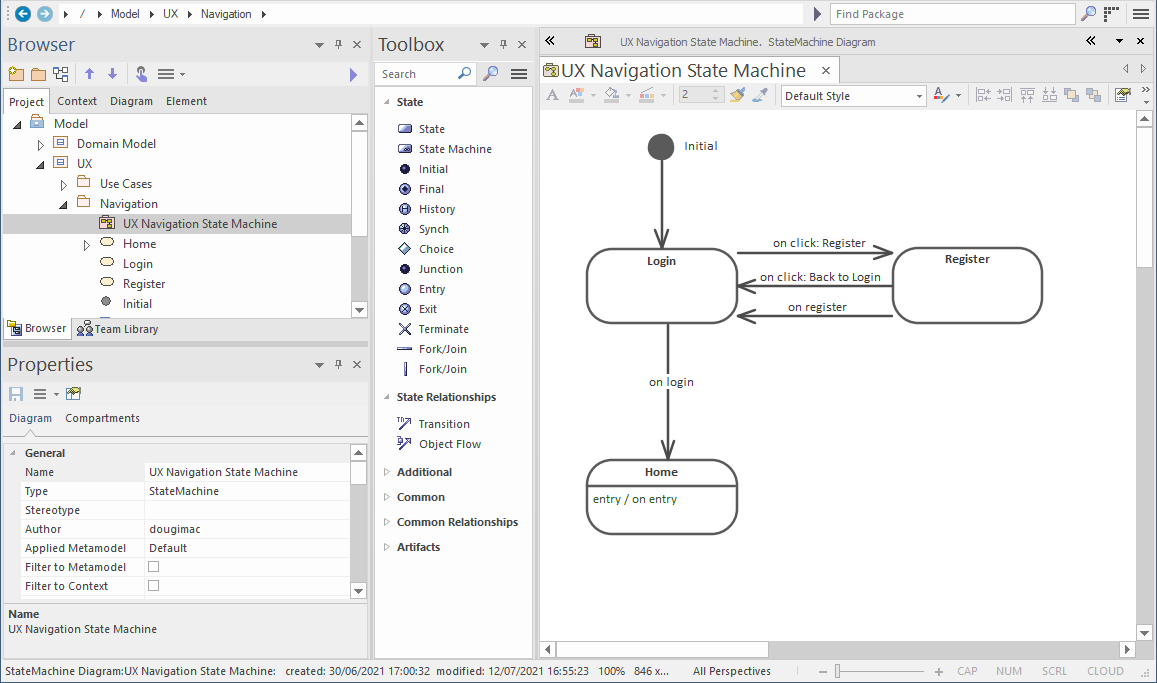
Hello CodeBot UI navigation
Once you’ve drawn each page (or at least defined them and created a placeholder wireframe for each one), you can define the overall site navigation. To do this, create a state machine like the following:
Assets package
This is where you can store images, stylesheets etc that you want to be packaged-up and included in the application build.
There are other ways to bring in custom files e.g. load CSS or images via external URLs at runtime; however, using the Assets package is a convenient way of keeping everything that defines the project in one place.
The Assets package name & location are just a recommendation. Any files included in the model will be bundled with the built & deployed application.
Summing up
Creating a full-stack application using CodeBot really is as straightforward as that! No coding required… although CodeBot doesn’t shy away from non-trivial applications requiring complex “business logic” code, either.
To illustrate the potential, we’ve included a working JavaScript code fragment in the model. This code is injected into the REST API and is triggered to run during certain server-side events. We’ll explore what the code does in a follow-up article.
You can also read this in-depth exploration of Hello CodeBot.
Please do give Hello CodeBot a try. If you encounter any problems getting it running, email us at support@parallelagile.com, and we’ll do our best to help out.
Meanwhile, back to the tutorial…